PLEASE ROTATE ME

Telink Staff
February 29, 2024
Technology

Here’s an in-depth guide to make the most of Remote Provisioning with Bluetooth ® Mesh and Telink.
When performing network provisioning in version 1.0 of the Bluetooth® Mesh specification, the Provisioner and the unprovisioned device are required to be in direct radio range (one-hop). Because the unprovisioned beacon packet cannot be relayed, provisioning can’t be achieved for devices out of direct radio range with the Provisioner.
To add nodes beyond the one-hop range into the network, version 1.1 of the Bluetooth Mesh specification introduces the Remote Provisioning (RPR) feature. RPR adds nodes and includes a relay function enabling the integration of distant nodes into the network. Presently, Telink’s TLSR825x and TLSR921x SoCs offer comprehensive support for all the new features introduced in Bluetooth Mesh specification 1.1, including RPR.
Important application scenario: Following the use of RPR, in cases where relocating the host (Provisioner) proves impractical, the mesh network can still be established with mesh nodes positioned based on the desired application scenario. This approach is particularly relevant in scenarios involving gateways as the Provisioner.
The RPR networking process is as follows:
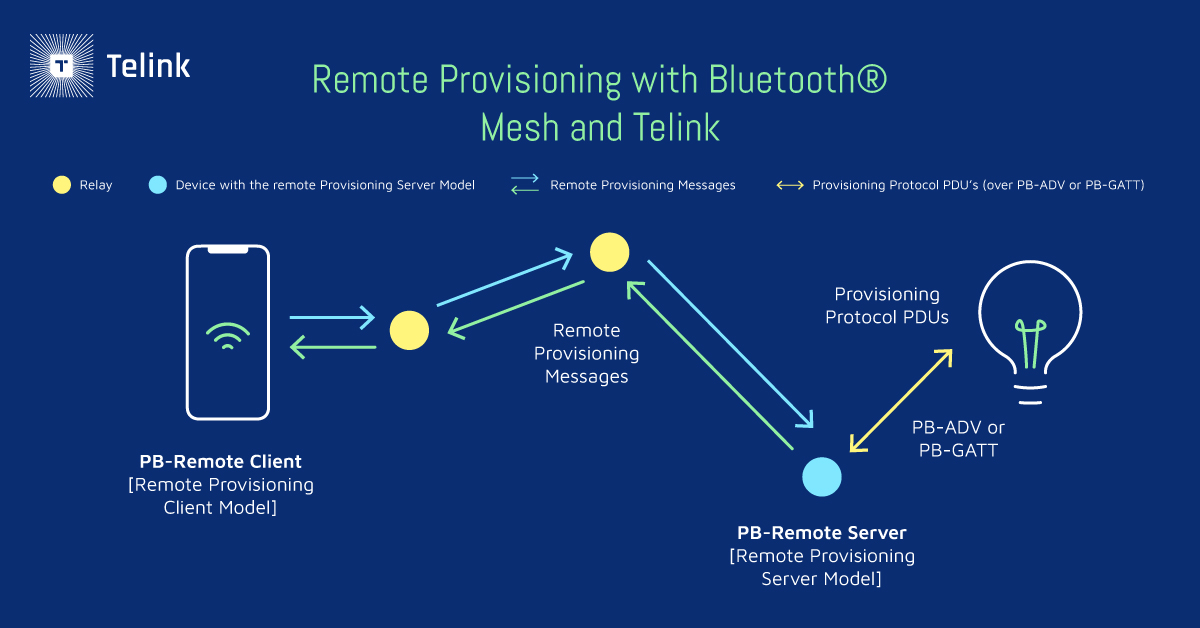
In addition to remote provisioning, RPR can be used to update the Device Key, Node Address, and Composition Data.
Test Conditions
1. Software Development Kit (SDK)
Visit Telink’s Wiki to download the latest Bluetooth Mesh SDK.
2. Hardware
In this article, we use TLSR825x SoC as the evaluation platform. It requires at least two TLSR8258 dongles as mesh node devices, which you can purchase online or by contacting us.
3. Mobile App
An Android or iOS Bluetooth Mesh App is required.
Download the Android App from the above SDK package (\telink_sig_mesh_sdk\app\android\TelinkBleMesh\TelinkBleMeshDemo-V4.1.0.0-20231113.apk).
Download the iOS App by searching for “telinksigmesh” in the App Store.
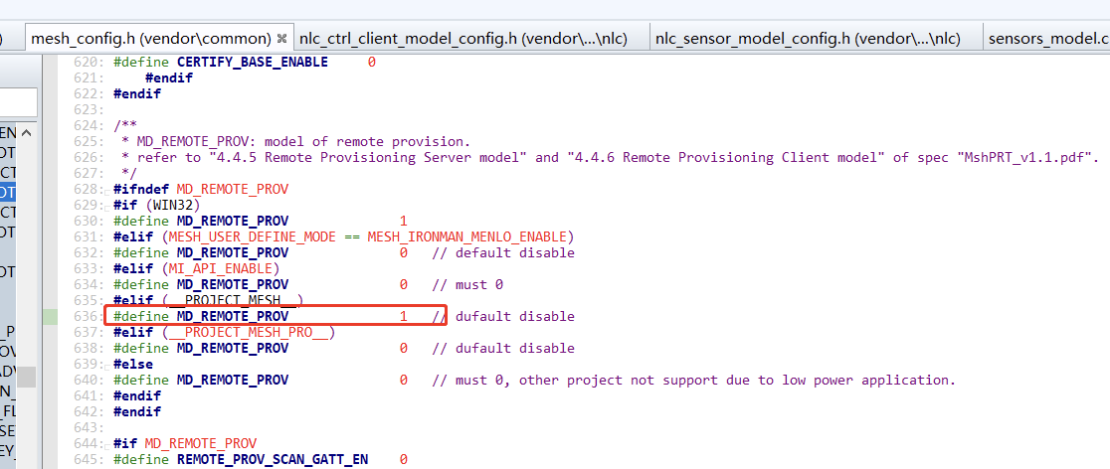
SDK Code Configuration
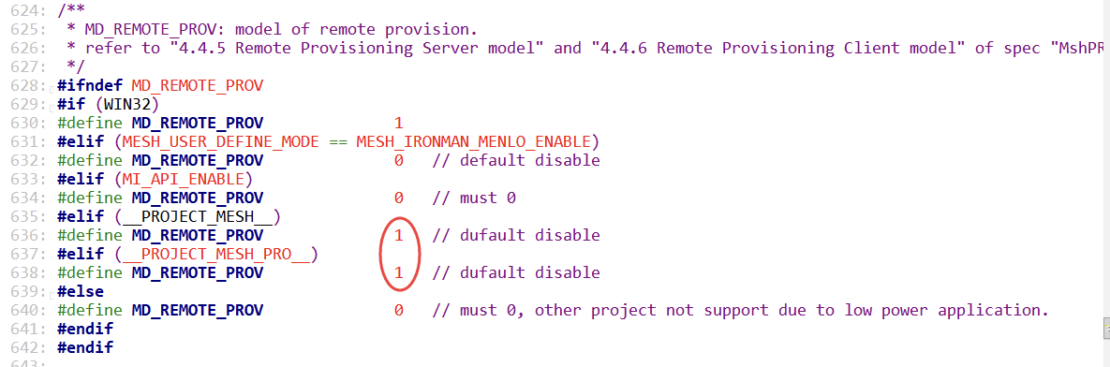
By default, the RPR functionality is deactivated. To activate it, enable the MD_REMOTE_PROV macro switch on the node side in the mesh_config.h file, as shown below.
Flash the compiled 8258_mesh.bin file onto two TLSR8258 dongles, then power them on.
App Settings
Launch the app, navigate to the homepage, and tap “Setting” and then “Settings”. Then, select “Provision Mode.” Choose “remote provision.”

Test Steps
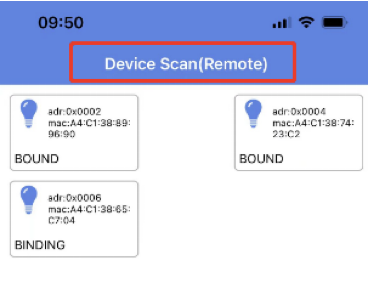
1. Tap the “+” icon on the App’s homepage to access the Remote Provision page, then initiate automatic provisioning. The App will first verify whether it is currently in a GATT-connected state with a provisioned node supporting the RPR function. If it isn’t, it will proceed with standard PB-GATT provisioning. But if it is, it will utilize this provisioned node to conduct RPR on other unprovisioned devices. As demonstrated in the figure below, the first node (top left) is provisioned via standard PB-GATT, while the subsequent two nodes (top right and bottom left) are provisioned through remote provision.
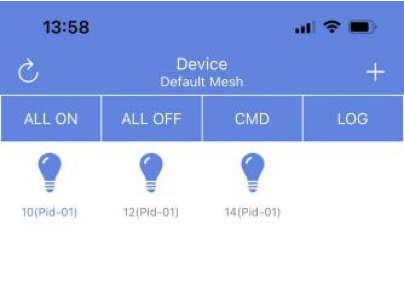
2. If no additional unprovisioned devices are detected within the timeout period, all nodes have been successfully provisioned. The homepage will revert to its original display.
Test Conditions
To test the RPR functionality via the gateway, you will need the same SDK used for the App testing (gateway code configuration is below). Additionally, use the TLSR8258 dongles as test hardware, with one dongle as the gateway device and the remaining dongles (≥2) acting as mesh node devices.
This test requires PC tools included in the SDK package at the following location: \tools\sig_mesh_tool.exe.
SDK Code Configuration
By default, the RPR functionality is disabled. To activate it, enable the macro switch MD_REMOTE_PROV on both the gateway and node sides within the mesh_config.h file, as indicated below.
Compile the code separately for the gateway and node devices. Flash the resulting 8258_mesh_gw.bin file onto the gateway dongle and the 8258_mesh.bin file onto the node dongle. Next, insert the gateway dongle into the computer’s USB port and power on the remaining node dongles.
Test Steps
1. Connecting one or more nodes using the standard PB-ADV mode
When the network is empty, which means there are no provisioned devices, you’ll need to use the standard PB-ADV mode to provision one or more nodes within one hop of the gateway.
Connect the gateway dongle to the PC via the USB port. Launch the sig_mesh_tool application on the PC, choose the ini file that matches the gateway, as illustrated in the figure below, and use PB-ADV to provision one or more mesh nodes. For detailed instructions, consult the Gateway Project Provisioner Lighting Chapter (10.4) in the Sig Mesh Handbook.

Once the network has been established, select the “Mesh” button in the lower right corner to access the mesh control interface. This triggers the LIGHTNESS_GET all command to retrieve all current nodes and display them on the homepage UI.
2. Adding mesh nodes using RPR
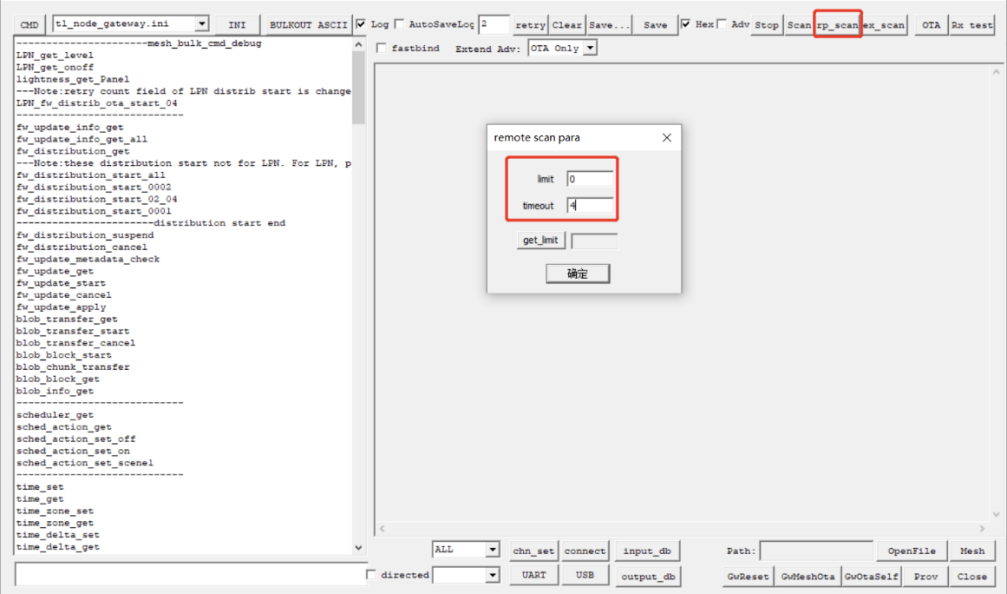
(2.1) Click the “rp_scan” button on the homepage UI as shown in the image below. Adjust the limit (Maximum number of scanned items to be reported. Value 0 indicates no limit.) and timeout (scan timeout limit in seconds) parameters if you want to change them. Then, click “Confirm.” The tool will send the scan start command to the list of provisioned nodes acquired in the preceding step.
The node will respond with its scan status upon receiving the scan start command.
(2.2) The designated scanning node will report the unprovisioned nodes to the gateway via the REMOTE_PROV_SCAN_REPORT message during the scanning process, as shown below.
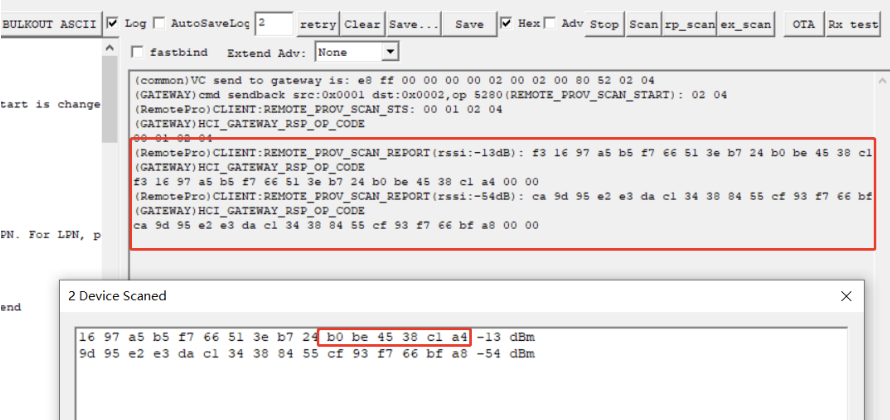
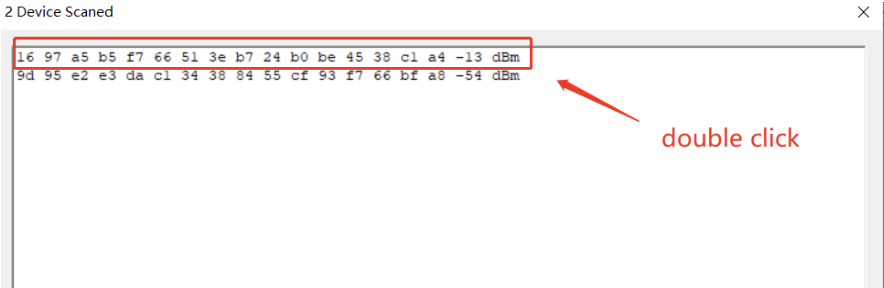
(2.3) Select an unprovisioned device from the list of scanned devices (as shown below) and initiate the transmission of the Remote Provisioning Link Open command by double-clicking on it.
(2.4) Press the “Prov” button on the homepage UI to access the provisioning interface.
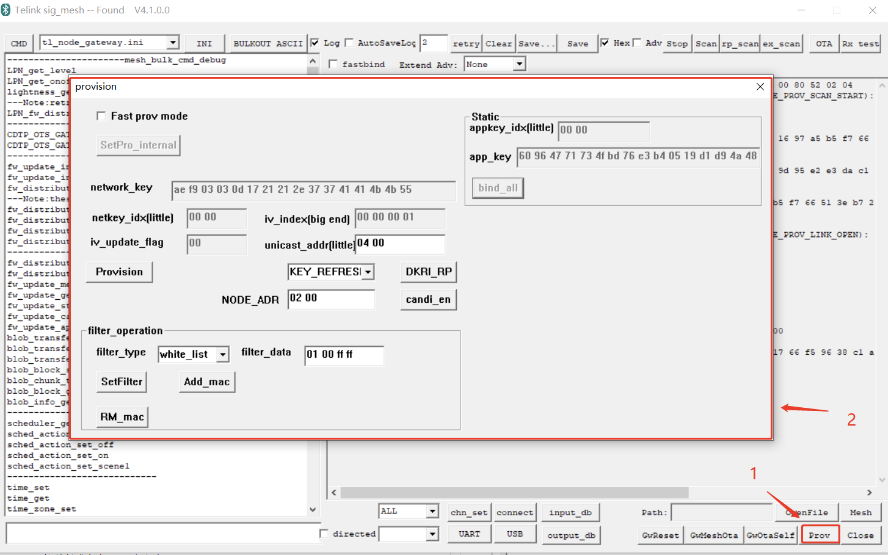
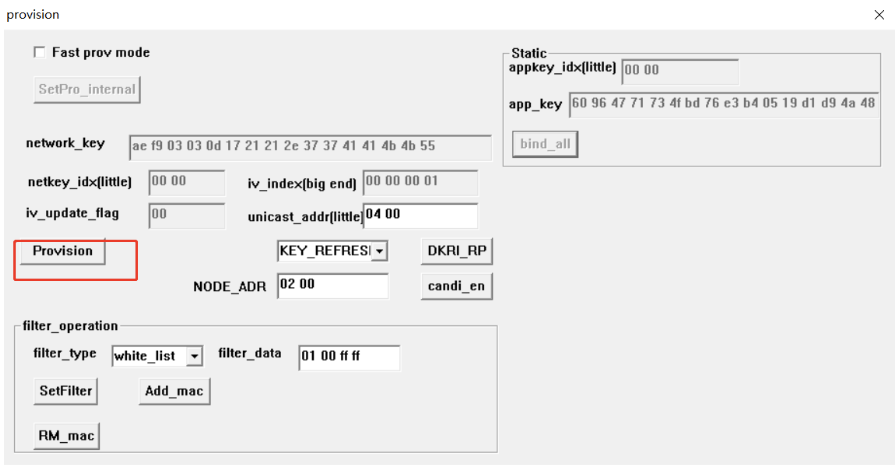
(2.5) Press the Provision button to initiate the device onboarding process.
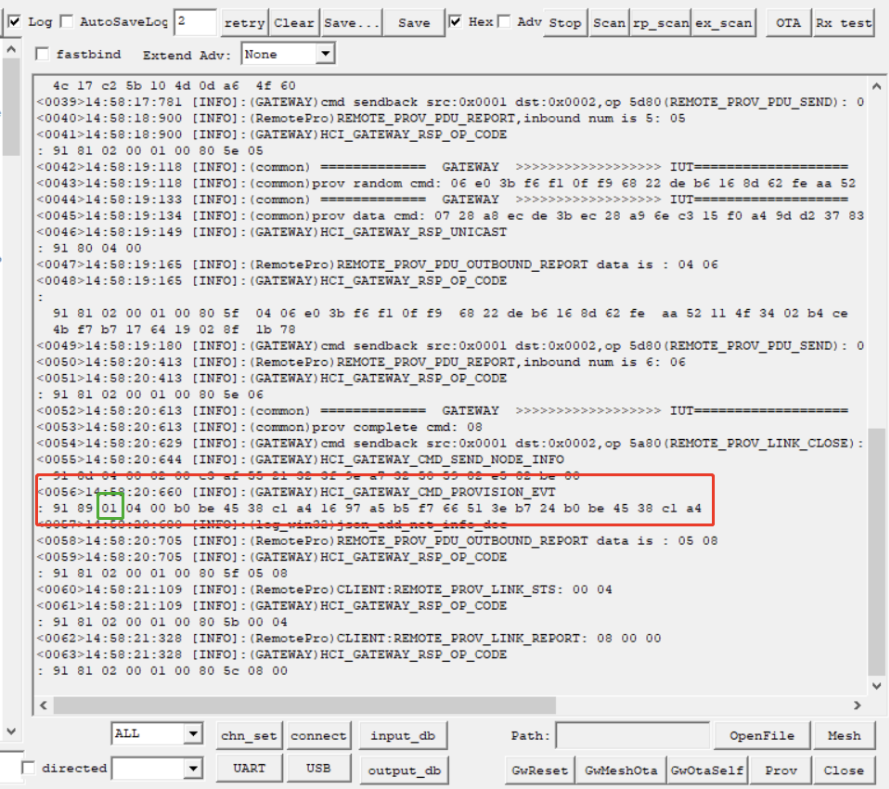
(2.6) After provisioning is completed, the device will report its provision status.
(2.7) After provisioning is completed, you must still bind the app_key to the model. Click “bind_all” to perform this action. The process remains the same as in non-RPR mode.
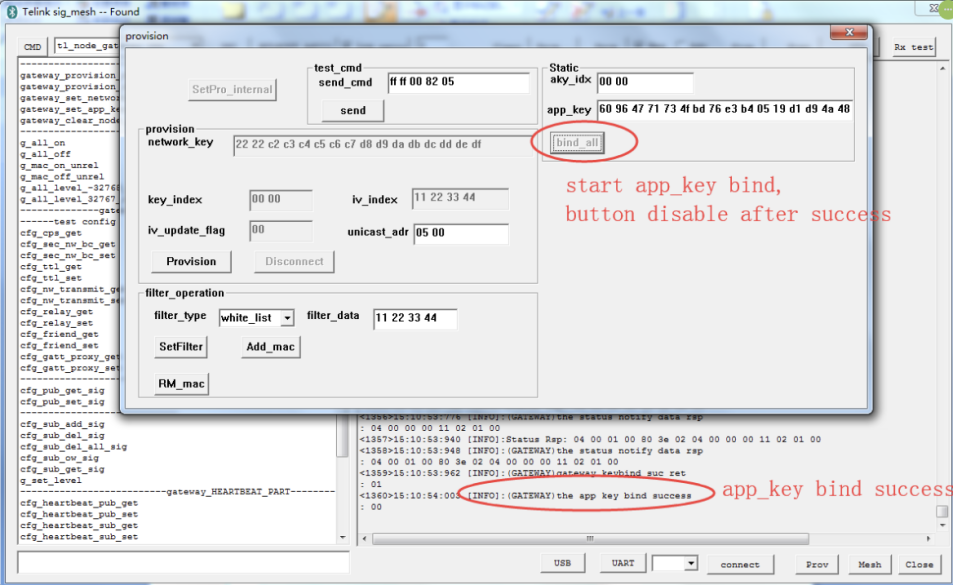
At this point, the process of adding the node to the network through RPR is finalized.
(2.8) Repeat steps (2.1) to (2.7) to perform RPR on additional unprovisioned devices until all devices are provisioned.
Remote Provisioning (RPR) is a key addition in Bluetooth Mesh specification 1.1. The Provisioner can use relay nodes to add remote mesh devices beyond its one-hop connection range, thus extending the network and simplifying the mesh network establishment process significantly. This article uses the TLSR825x SoC as an example to introduce the basic method of testing and verifying RPR functionality via the mobile App and PC tools provided by Telink.
Telink Semiconductor’s TLSR825x and TLSR921x series chips offer comprehensive support for all the latest Bluetooth Mesh specification 1.1 features, including RPR.
Visit Telink’s wiki to learn more about our development tools, or ask us a question through our Technical Forum or by contacting us directly today.